Redis Use Cases Examples in the Real-World
Redis is powerful tools that already used in wide range use cases such as: profile caching, session storage, redis for leaderboard, redis shopping cart, and more
Hello, I apologize for the delay in publishing. It was due to the extensive length of the content I wanted to write. Today, we will discuss the tools that have accelerated the growth of my career, technology that has greatly benefited me in my software engineering journey. It is Redis, we are going to learn redis real-world use cases including system design and pseudocode on how to implement it.
Quick Links:
Build Realtime Chat Using Redis (Direct Message & Group Chat)
Geolocation Distance (Find Driver Near Me & Employee Check In)
If you asked about the tools I love the most, Redis is definitely one of them. Redis is a great tool for two reasons:
Simplicity: Redis is simple to understand and use.
Wide range of use cases: Redis can solve a lot of real-world use cases.
Take a look the infographic what redis capable of in solving real-world use cases.
Notes: use cases above just a few cases that often we met in real life, but of course there are more use cases that can be solved by redis
In almost every major tech industry, including e-commerce, ride-hailing, travel, and more, Redis can be utilized to solve various use cases. This truly showcases the power of Redis. Without further ado, let's go deeper into how Redis can be employed in real-world scenarios.
User Profile Cache (HTTP API Cache)
Redis Commands: GET, SET, EXPIRE
HTTP API cache refers to the caching of HTTP responses from an API (Application Programming Interface). It involves storing the response of an API request in a cache, which can be subsequently used to serve future requests without the need to re-fetch the data from the API server.
One of the common use cases for API caching is storing user profiles. In an authentication system, usually only the user ID or email (something unique) is stored in the authentication token. However, the frontend often requires the user's name and profile picture on every page. Retrieving the user profile repeatedly can become redundant, so api caching with Redis can greatly enhance scalability.
function GetUserProfile(user_id) {
    var cache_response = redis.Do(`GET user:{user_id}`)
    if(cache_response) {
        return json.Unmarshal(cache_response)
    }

    var response = getProfile(user_id)
    var marshalled_resp = json.Marshal(response)
    redis.Do(`SET user:{user_id} {marshalled_resp} EX 600`)
    return response
}
HTTP REST APIs typically return JSON responses. If we want to utilize Redis to cache the responses, we can store JSON string as the cached value. For subsequent requests, we can simply unmarshalled the string and return the cached JSON object.
Redis for Session Storage (Login & Logout)
Related Commands: GET, SET, EXPIRE, DEL
Session-based authentication is a widely used approach for user authentication in web applications. It involves generating a session token after login, which is then used to keep track of the authenticated user.
Similar to the issue with user profiles, the session token needs to be checked every time a user performs an action that requires authentication. Consequently, querying the database can easily become a bottleneck in high-traffic use cases. Therefore, using Redis for session storage is considered one of the best solutions.
function Login(email, password){
    var session_token = loginLogic()
    redis.Do(`SET user:session:{session_token} {email} EX 3600`)
    return session_token
}

function Logout(session_token){
    redis.Do(`DEL user:session:{session_token}`)
}

function VerifyToken(session_token) {
    var email = redis.Do(`GET user:session:{session_token}`)
    if(!email) {
        return null, errors(`token is expired or not exists`)
    }
    var user_detail = getUserDetail(email)
    return user_detail, null
}
Log In Throttling
Related Command: INCRBY, EXPIRE, TTL
Authentication has many interesting use cases, one of which is preventing users from hacking other users through brute force attacks. One of the easiest ways to achieve this is by implementing throttling. Throttling refers to the practice of intentionally limiting the rate or speed of a process or service. You might have seen messages such:
“There have been too many login failures. Try again in x seconds”
This is an implementation of throttling for login attempts to prevent brute force attacks. In a simple manner, throttling involves storing the number of login attempts made by a user. However, storing this data in databases like MySQL or PostgreSQL may seem overly engineering. Additionally, databases like MySQL and PostgreSQL do not have built-in time-based expiration, unlike Redis. Using Redis to implement throttling is a straightforward solution. Please refer to the system design below:
function Login(context, username, password){
    var guest_session = context.GuestSession
    var max_attempt = 5
    var current_attempt = redis.Do(`GET login_attempt:{guest_session}`)
    if(current_attempt >= max_attempt){
        var expire_lock = redis.Do(`TTL login_attempt:{guest_session}`)
        return null, errors(`There have been too many login failures. Try again in {expire_lock} seconds`)
    }

    var is_login_success, auth_token = login(username, password)
    if(!is_login_success) {
        redis.Do(`INCR login_attempt:{guest_session}`)
        redis.Do(`EXPIRE login_attempt:{guest_session} 300`)
        return null, errors("user not found / invalid password")
    }
    redis.Do(`DEL login_attempt:{guest_session}`)
    return auth_token, null
}
Dynamic Pricing in Hotel Industry (Redis Distributed Locking)
Related Command: GET, SET NX EX
When working with horizontal scaling or even microservices, it becomes necessary to implement distributed locking at the application level to address issues such as race conditions or thundering herd problems. Redis can be leveraged for distributed locking, offering several advantages including high scalability, fault tolerance, and strong consistency guarantees.
Consider a scenario where you are developing a hotel booking platform that fetches dynamic prices from a third-party API. In a situation where multiple users are requesting hotel information for the same date, you may want to avoid overwhelming the third-party API. Here, you can utilize Redis distributed locking to resolve this issue effectively.
function CheckHotelPrice(hotel_id, book_date) {
    var price_detail = null
    while(true) {
        price_detail = redis.Do(`GET hotel_price:{hotel_id}:{book_date}`)
        if(price_detail != null){
            break
        }

        var current_machine_name = os.GetHostname()
        var acquire_lock = redis.Do(`SET hotel_price:{hotel_id}:{book_date}:lock {current_machine_name} NX EX 5`)

        if(!acquire_lock){
            sleep(250) // waiting 250 ms
            continue
        }

        price_detail = getHotelPriceFromThirdParty(hotel_id, booking_at)
        redis.Do(`SET hotel_price:{hotel_id}:{book_date} {price_detail} EX 600`)
	break
    }

    return price_detail
}
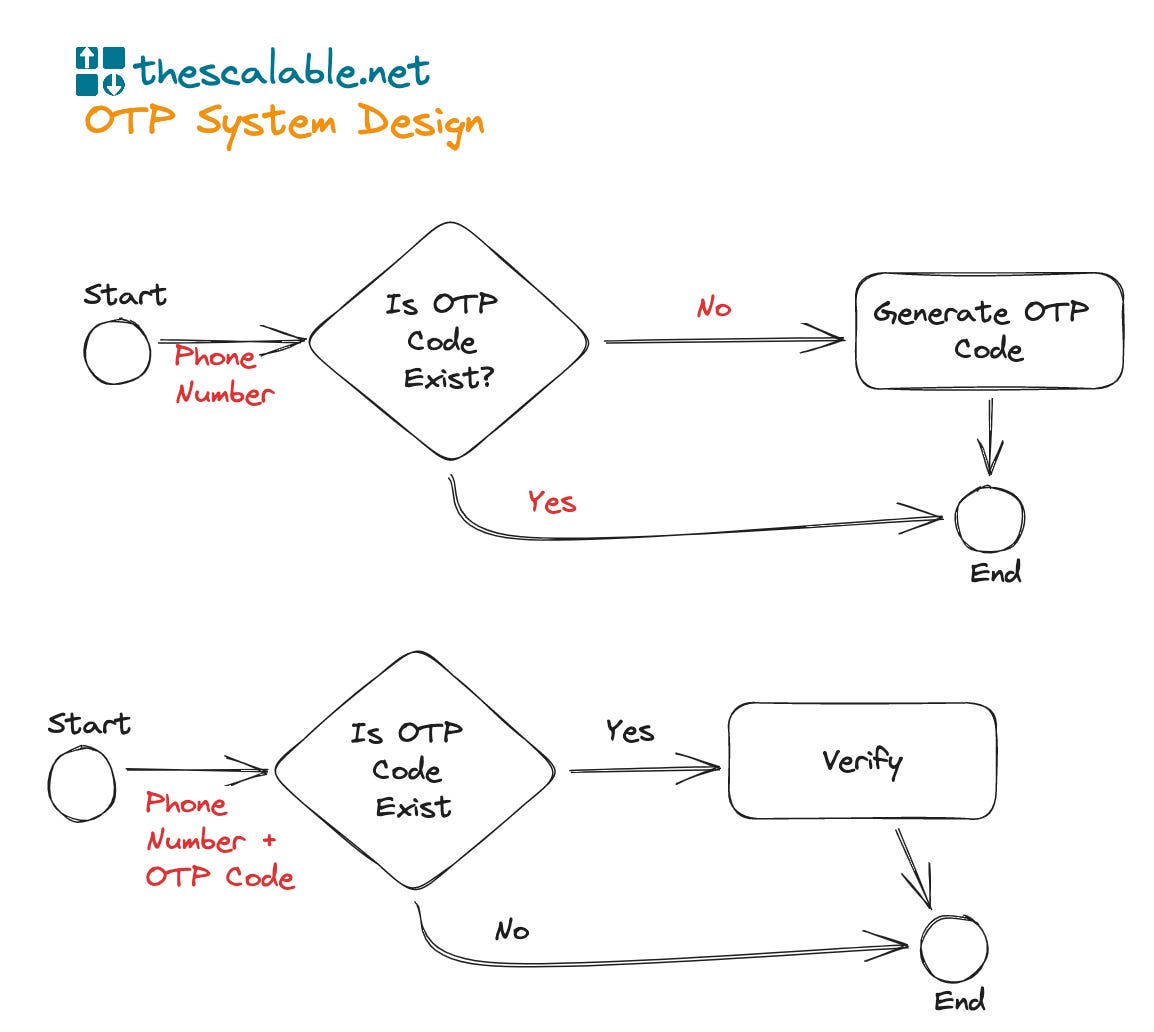
OTP (One Time Password) using Redis
Related Command: SET NX EX, GET, DEL
"OTP" stands for "One-Time Password." It is a security measure used to authenticate users and verify their identity during online transactions or account logins. A one-time password is a unique and temporary code that is typically valid for a short period of time, usually for a single login session or transaction. Since Redis has time-based expiration using the EXPIRE command, it is well-suited for building an OTP (One-Time Password) system.
The OTP system consists of two functions:
Generate OTP
Verify OTP
Redis can be leveraged to build an OTP system. Below is pseudocode that demonstrates how Redis can be used to develop an OTP system:
function GenerateOTP(phone_number) {
    var otp_code = generate_otp_code(6)
    var is_success = redis.Do(`SET otp:{phone_number} otp_code NX EX 600`)
    if(!is_success){
        var ttl = redis.Do(`TTL otp:{phone_number}`)
        return errors("otp has been sent, try again in {ttl} minutes")
    }
    sendOtpViaSMS(phone_number, otp_code)
    return null
}

function VerifyOTP(phone_number, otp_code) {
    var stored_otp = redis.Do(`GET otp:{phone_number}`)
    if(!stored_otp){
        return errors(`Code has been expired`)
    } else if(stored_otp != otp_code){
        return errors(`Invalid OTP Code`)
    }

    redis.Do(`DEL otp:{phone_number}`)
    return null
}
Waiting List in Help Desk System (Redis for Job Queue)
Related Commands: LPUSH, RPOPLPUSH, LREM, LPOS
A help desk is a system designed to manage and streamline customer support and issue resolution processes within an organization. When the number of support request much bigger than the number of customer support it will generate a problem.
Imagine you only have 3 customer support officer and at one time there are 100 request to have chat support, how to solve it?
It’s a common where help desk system has waiting list mechanism. In technical, waiting list is similar to JOB QUEUE in data structure. Redis has a powerfull command to solve job queue problems. In a help desk system, there are at least two functions:
Create Request (by User)
Handle Support Request (by Customer Support)
function CreateRequest(payload){
    var request_id = createSupportRequest(payload)
    redis.Do(`LPUSH helpdesk {request_id}`)
}

function GetQueuePos(request_id){
    var my_queue_number = redis.Do(`LPOS helpdesk {request_id} RANK -1`)
    // Notes: "RANK -1" means you reverse the sort
    return my_queue_number + 1
}

function HandleSupportRequest(cs_id){
    while (true) {
        var request_id = redis.Do(`RPOPLPUSH helpdesk helpdesk:{cs_id}`)
        if(request_id == null) {
            sleep(60)
            continue
        }
        var request_detail = getSupportRequest(request_id)
        connect(cs_id, request_detail.user_id)
        redis.Do(`LREM helpdesk:{customer_support_id} 1 {request_id}`
    }
}
Search History Feature
Related Commands: LPUSH, LRANGE, LREM
Search history is a common feature that we often met in various website including e-commerce, news, etc. Everytime user searching some keywords, the keyword would be stored and will be pop up in the next searching.
Search history is basically a data structure problem, and with redis we can use list commands to build this feature.
function Search(user_id, keywords) {
    var resp = searchLogic(keywords)
    redis.Do(`LREM history:{user_id} 1 {keywords}`)
    redis.Do(`LPUSH history:{user_id} {keywords}`)
    return resp
}

function GetSearchHistory(user_id) {
    var histories = redis.Do(`LRANGE history:{user_id} 0 -1`)
    return histories
}
Redis for Shopping Cart (Add to Cart)
Related Commands: HGETALL, HINCRBY, HDEL
Shopping Cart / Add to Cart feature is commonly found on e-commerce websites or online shopping platforms. It allows users to select products they wish to purchase by clicking on the "Add to cart" button or a similar option. This action adds the chosen item to a virtual shopping cart, serving as a temporary storage before finalizing the transaction.
Once items are added to the cart, users can typically view the contents, make changes to quantities or options, and remove items if necessary. To implement the "Add to Cart" feature, a storage system is required, and Redis can be leveraged for this purpose.
See the pseudocode below on how redis can be used for add to cart feature:
function CreateAddToCart(user_id, item_id){
    redis.Do(`HINCRBY cart:{user_id} {item_id} 1`)
}

function ChangeQuantity(user_id, item_id, quantity){
    var current_qty = redis.Do(`HSET cart:{user_id} {item_id} {quantity}`)

    if(current_qty <= 0){
        RemoveAddToCart(user_id, item_id)
    }
}

function GetAllAddToCart(user_id){
    var shopping_carts = redis.Do(`HGETALL cart:{user_id}`)
    return shopping_carts
}

function RemoveAddToCart(user_id, item_id){
    redis.Do(`HDEL cart:{user_id} {item_id}`)
}
Redis Real Time Analytics (View, Like, Transaction, etc.)
Related Commands: HGETALL, HINCRBY
Redis hash commands (with the prefix H) are commonly used by tech companies to track real-time analytics such as views, likes, transactions, and more. Implementing this functionality is straightforward and efficient using the HINCRBY command to increment the count of the data we want to track. To retrieve and display the tracked data, we can use the HGETALL or HGET command.
To gain a better understanding, let's imagine that we are an e-commerce company aiming to track real-time data on product page views, wishlists, and transactions. See the pseudocode below
function ViewProduct(product_id) {
    var product_info = getProduct(product_id)
    redis.Do(`HCINRBY product:tracker:{product_id} view 1`)
}

function Wishlist(user_id, product_id) {
    wishlistLogic(user_id, product_id)
    redis.Do(`HCINRBY product:tracker:{product_id} wishlist 1`)
}

function CreateTransaction(user_id, product_id) {
    createTransactionLogic(user_id, product_id)
    redis.Do(`HCINRBY product:tracker:{product_id} transaction 1`)
}

function GetProductStatistic(product_id) {
    var stats = redis.Do(`HGETALL product:tracker:{product_id} `)
    return stats
}
Redis for Leaderboard
Related Commands: ZADD, ZRANGE
Leaderboards are commonly utilized in gamification or competitive environments. They consist of several components, including:
Users
Score
Rank
Redis sorted sets are an excellent choice for storing user data and their corresponding scores, which can then be sorted to determine ranks. Redis's exceptional speed makes it suitable for leaderboard use cases that require frequent read and write operations.
We have previously discussed the Leaderboard System Design. For more information, please refer to the article we discussed earlier.
Leaderboard System Design
Build leaderboard database & system design including redis leaderboard system
But, Here is a sneak peek at how Redis can be used for implementing a leaderboard feature. Please find the pseudocode below:
function AddScore(user_id, score){
    redis.Do(`ZADD leaderboard {score} {user_id}`)
}

function GetTop10(){
    var top_ten_leaderboard = redis.Do(`ZRANGE leaderboard 0 9`)
    var resp = getLeaderboardDetails(top_ten_leaderboard)
    return resp
}
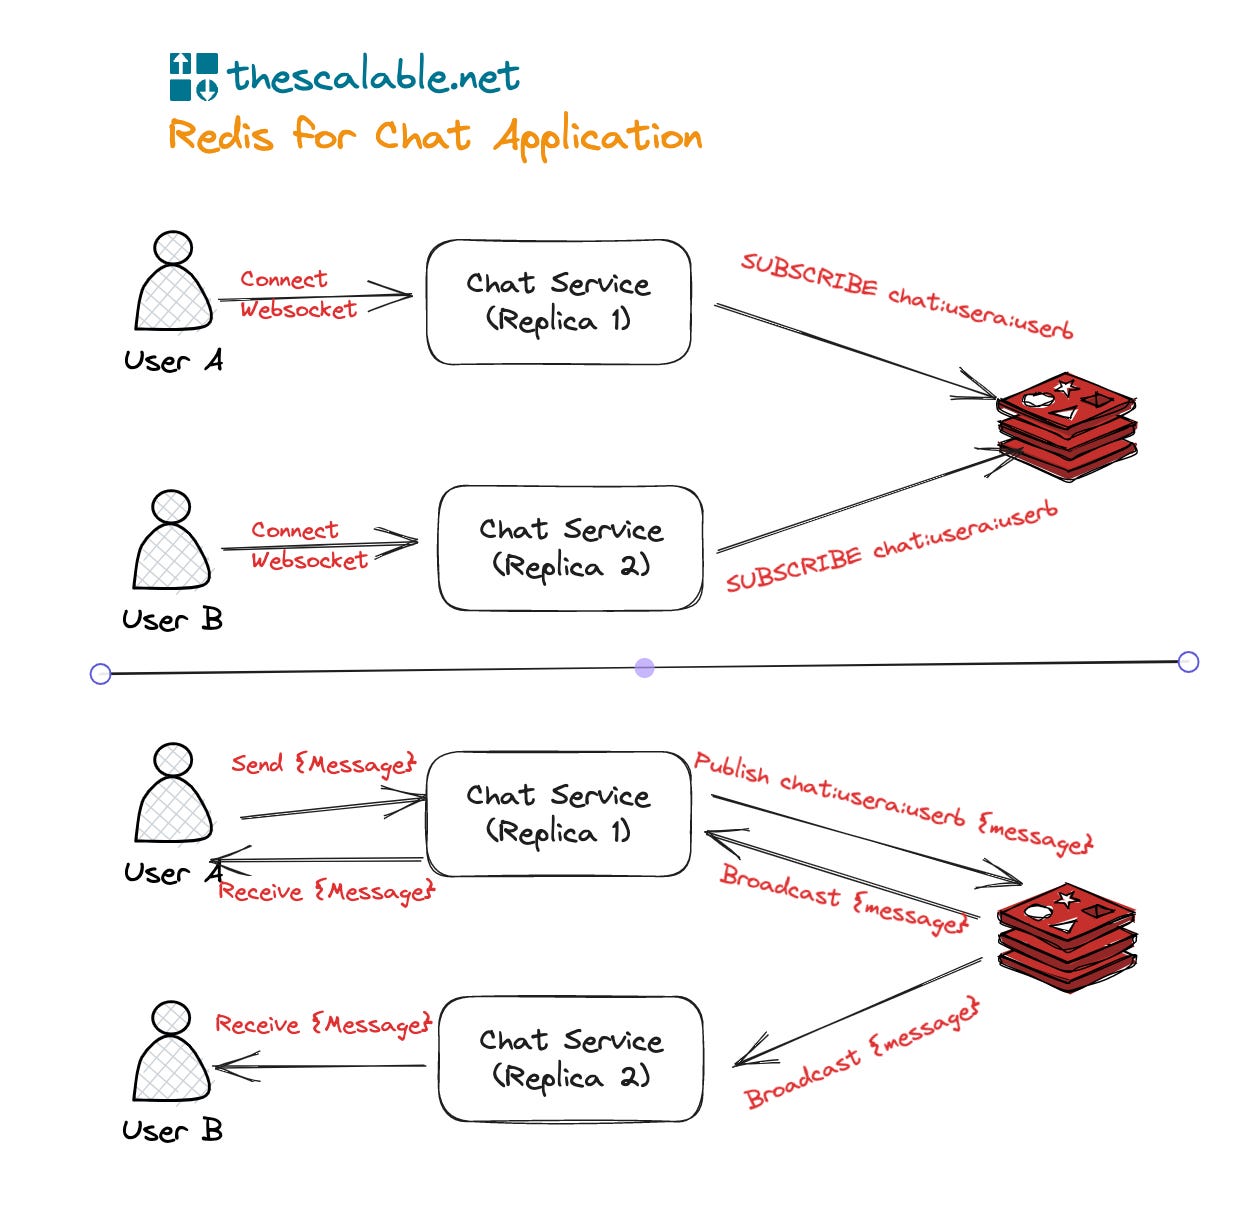
Redis Real Time Chat
Related Commands: PUBLISH, SUBSCRIBE
When discussing chat application, we often refer to WebSocket systems or protocols like XMPP (WhatsApp have using this in its early day). However, these solutions primarily address real-time communication challenges between the frontend and backend. While they may be suitable for single-machine systems, scaling the system horizontally can become problematic. Fortunately, Redis offers a powerful solution called PUBSUB (publish-subscribe). This mechanism allows us to leverage PUBSUB for building a chat system. Let's explore two use cases:
Direct Chat 1:1 Chat
Group Chat
Let's begin with the pseudocode for the 1:1 (direct message) chat feature.
Note: The key aspect of the 1:1 chat (direct message) feature is that the Redis key needs to be consistent, regardless of whether you are user_a or user_b. Both users should have the same Redis key string.
function generateRedisKey(){
    var user_a = your_user_id
    var user_b = target_user_id
    if(user_a > user_b){
        user_a = target_user_id
        user_b = your_user_id
    }
    return `directchat:{user_a}:{user_b}`
}

function JoinChat(your_user_id, target_user_id){
    var redis_key = generateRedisKey(your_user_id, target_user_id)
    var subscribe_handle = redis.Do(`SUBSCRIBE {redis_key}`)
    subscribe_handle.OnMessage((message) {
        if(message == "\quit") {
            return
        }
        // do something with message
    })
}

function SendMessage(your_user_id, target_user_id, message){
    var redis_key = generateRedisKey(your_user_id, target_user_id)
    redis.Do(`PUBLISH {redis_key} {message}`)
}

function CloseChat(your_user_id, target_user_id){
    var redis_key = generateRedisKey(your_user_id, target_user_id)
    redis.Do(`PUBLISH {redis_key} "\quit"`)
}
If you want to implement a group chat feature, the approach is quite similar, with the key difference lying in the structuring of the Redis keys. Let's take a look at the following pseudocode to understand it better
function JoinChat(user_id, group_id){
    var subscribe_handle = redis.Do(`SUBSCRIBE chat:group:{group_id}`)
    subscribe_handle.OnMessage((message) {
        if(message == "\quit") {
            return
        }
        // do something with message
    })
}

function SendMessage(user_id, group_id, message){
    redis.Do(`PUBLISH chat:group:{group_id} {message}`)
}

function CloseChat(user_id, group_id){
    redis.Do(`PUBLISH chat:group:{group_id} "\quit"`)
}
The chat system we've discussed so far is a simple implementation. Real-world chat systems like Twitch chat, Slack, and Discord have more complex features and requirements. However, I believe Redis can still be leveraged to build even these more complex chat systems. (Maybe later I will write special related to building chat application).
Realtime Notification
Related Commands: PUBLISH, SUBSCRIBE
Real-time notification is a useful feature that is typically used to engage your customers, such as providing announcements, promotions, and more. Marketers often utilize this feature to communicate their marketing strategies.
It is similar to how Redis can be used to build real-time chat features. By utilizing WebSockets and Redis, we can create real-time notifications. In the Redis component, we can employ PUBSUB commands to facilitate real-time notifications
function WebsocketConnect(ws_context, user_id){
    var subscribe_handle = redis.Do(`SUBSCRIBE notification:{user_id}`)
    subscribe_handle.OnMessage((message) {
        ws_context.Push(message)
    })
}

function Broadcast(user_id, message){
    redis.Do(`PUBLISH notification:{user_id} {message}`)
}
Geolocation Distance: Driver Distance & Attendance System
Related Commands: GEOADD, GEODIST, GEOSEARCH
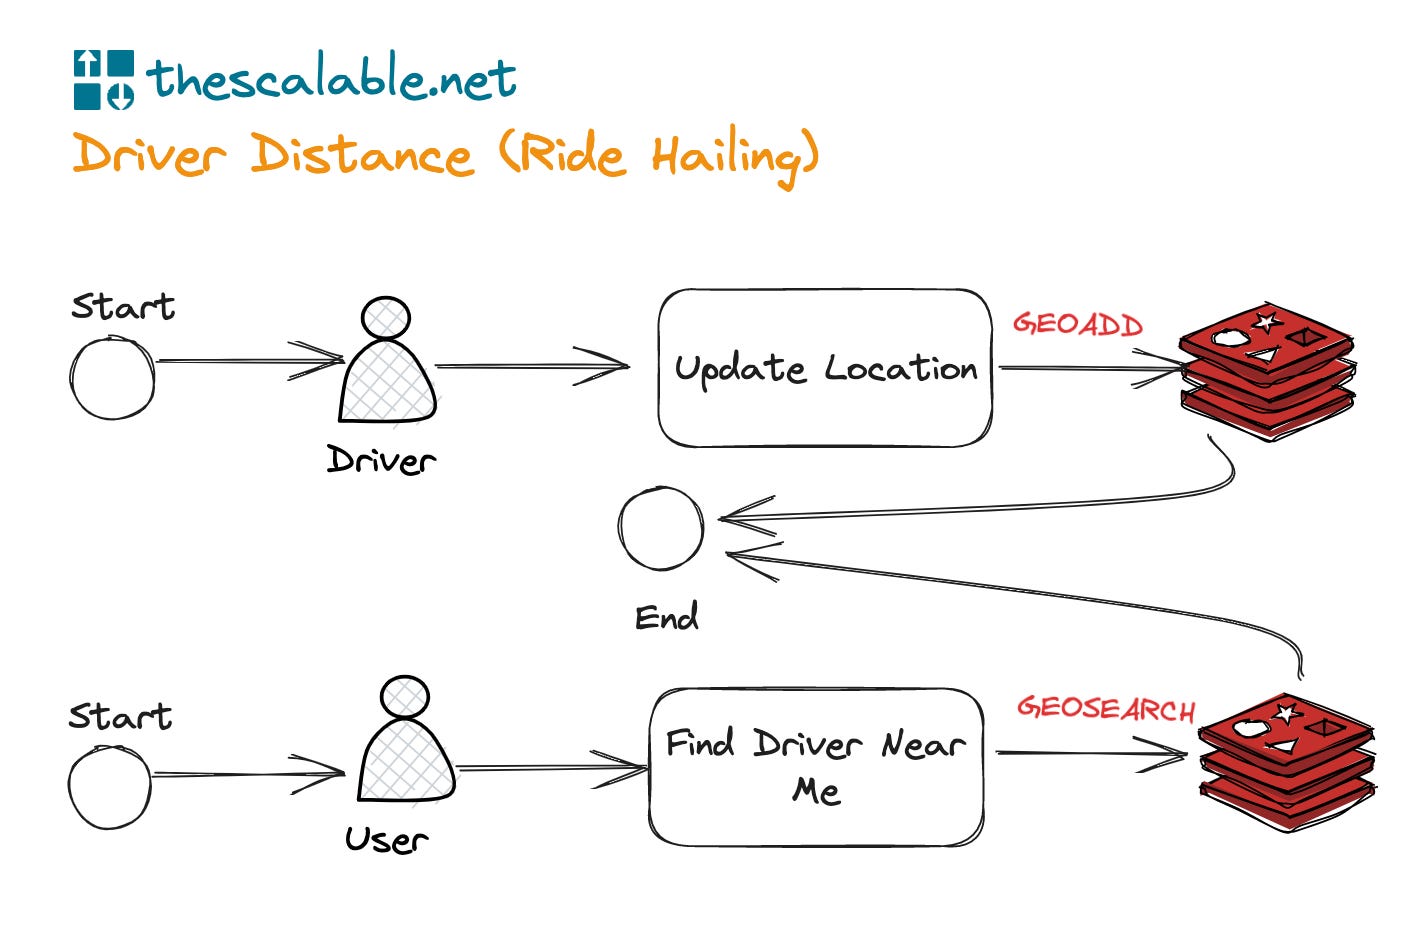
Redis has another feature related to geolocation. This geolocation functionality is typically used in various scenarios. Here are some scenarios that you might related to:
Ride Hailing. You might need to find which driver that near the user and how is the distance
Employee Attendance System. In attendance system, checkin via mobile apps might requires geolocation checking to ensure the employee really come to the location.
Maps. I think we don;t need to explain what relation geolocation and map
Now we are going to focus on ride hailing and attendance system. In redis geolocation funciton can be implemented using commands with prefix GEO. Let’s start with solving ride hailing problem, which is retrieve all driver that near to the customer.
function DriverUpdateLocation(driver_id, lat, lng){
    redis.Do(`GEOADD ridehailing {lng} {lat} {driver_id}`)
}

function FindDriverNearMe(lat, lng){
    var driver_with_distance = redis.Do(`GEOSEARCH ridehailing {lng} {lat} BY BOX 100 100 KM ASC WITHDIST`)

    var resp = getDriverDetail(driver_with_distance)

    return resp
}
If you understand how ride-hailing services can utilize Redis geolocation to solve their problems, then understanding the usage in an attendance system becomes easy. The concept is similar, but the key difference lies in the location being searched. In ride-hailing, the location pertains to the driver, which is dynamically updated. However, in an attendance system, the location refers to the fixed company location. As a result, it needs to be pre-filled into Redis.
function PrefillCompanyLocation(){
    redis.Do(`GEOADD company_location {lng_1} {lat_1} {location_id_1}`)
    redis.Do(`GEOADD company_location {lng_2} {lat_2} {location_id_2}`)
    redis.Do(`GEOADD company_location {lng_3} {lat_3} {location_id_3}`)
}

function CheckIn(employee_id, location_id, lat, lng){
    var company_locations = redis.Do(`GEOSEARCH company_location {lng} {lat} BYRADIUS 10 M ASC`)

    if(company_locations[location_id] == null){
       return errors(`You are not in location range`)
    }

    checkinLogic(employee_id, location_id, NOW())
    return null
}
That's all for today. It was quite a long list, but it truly highlighted the power of Redis. I suggest you learn the fundamentals of Redis and how to utilize it to solve problems in your professional life. However, keep in mind that while Redis is powerful, there may be cases where it's better to use another technology. Stay open-minded, don’t become fanatics to one technology and, in the end, remember “always get back to the fundamentals”.
Thank you for reading today's newsletter! If you find it valuable, don’t forget to:


